It is similar to other popular tools (fsum, hashdeep, sha256sum, etc.),
but with features to make digital data auditing simpler and
faster.
auditor has support to several hash
algorithms. The default is sha256, that
is recommended by NIST since 2015 ( see
NIST
Policy on Hash Functions).
By default, thash method is enabled, but this
mode can be disabled.
Integrity Chain
The auditing process used by auditor is based on the concept of an
integrity chain, provided by audit files that stores integrity information.
The terms involved in this process are:
Audit_FullList: Is the audit file that contais integrity information of each original data
file processed.
Stamp: Is the atual integrity information of Audit_FullList file. Stamp is always recalculated and shown when performing
relevant actions.
Audit_Stamp: Is the audit file that stores Stamp of Audit_FullList , when it was created.
Fig.1 - Files involved in the process
The integrity chain is produced in the following order (in default behavior):
Data files inside input_path are processed and generates integrity information (hash,
size, relative filepath, etc.) that are stored in Audit_FullList.
Audit_FullList is also processed, generating Stamp,
that is printed in terminal and stored in Audit_Stamp.
The check of the integrity chain is done in the reverse order of the process above, reprocessing
files and
checking integrity against
audit files. Stamp is also recalculated, printed in terminal, and compared
with
that stored in Audit_Stamp, to
verify if it matches.
To proceed with the generation of the audit files and ensure that the future verification of the integrity
chain
is carried out correctly and securely, follow the steps below:
Organize your data files in a specific folder (referred to as the input_path ).
With auditor installed, open a command terminal and run
auditor hash input_path.
By default, this command will create the audit files Audit_FullList and
Audit_Stamp inside the root of the input_path folder. (This can be
changed, if
needed.)
Save all data, including the audit files, and either
print the contents of
Audit_Stamp or
digitally sign this file.
If you skip this step, anyone could alter the data and simply generate new audit files, compromising
integrity
verification.
If you don’t have access to a printer or a digital certificate at the moment, you can use a free
timestamping
authority to sign the file online,
such as freetsa.org (using Online Signature)
.
Optionally, you can create a package (such as a ZIP, TAR, or another container)
that includes both your data files and the audit files.
Make multiple backup copies of this package on different media.
Later, when someone performs a check with
auditor check, the integrity chain described above is executed.
At the end of the process, the integrity data from
Audit_FullList is recalculated and printed in the terminal
and MUST match exactly with the value printed or digitally signed in the previous step.
If it does not match, the integrity check is invalid.
You can also verify the integrity of individual original data files using the data in
Audit_FullList.
See examples in the usage section of
auditor check.
With auditor installed in your
system, you can use it as follows:
auditor subcommands:
hash
lock
check
info
clone
chkcopy
hash is the first step of forensic auditing. It generates
audit files that allow verifying file integrity.
Basic usage of subcommand hash
auditor hash input_path
This will:
Hash files in input_path with default algorithm (sha256)
Generate audit files (Default path: inside root of input_path ):
Audit_FullList: contains the
integrity data (hash, size, name) of files in
input_path. Default name:
_auditor_hashes.txt
Audit_Stamp: contains only
the integrity data of Audit_FullList.
Default name:
_auditor_stamp.txt.This is the
file that needs to be printed or digitally signed to ensure
check of all integrity chain.
Show integrity data of Audit_FullList
After hash, you can perform
check command to verify
integrity. To properly ensure integrity check in the future, read the section
Integrity Chain and follow advices there.
Others examples:
Just generate hashes, but don’t create any files (-l)
auditor hash input_path -l
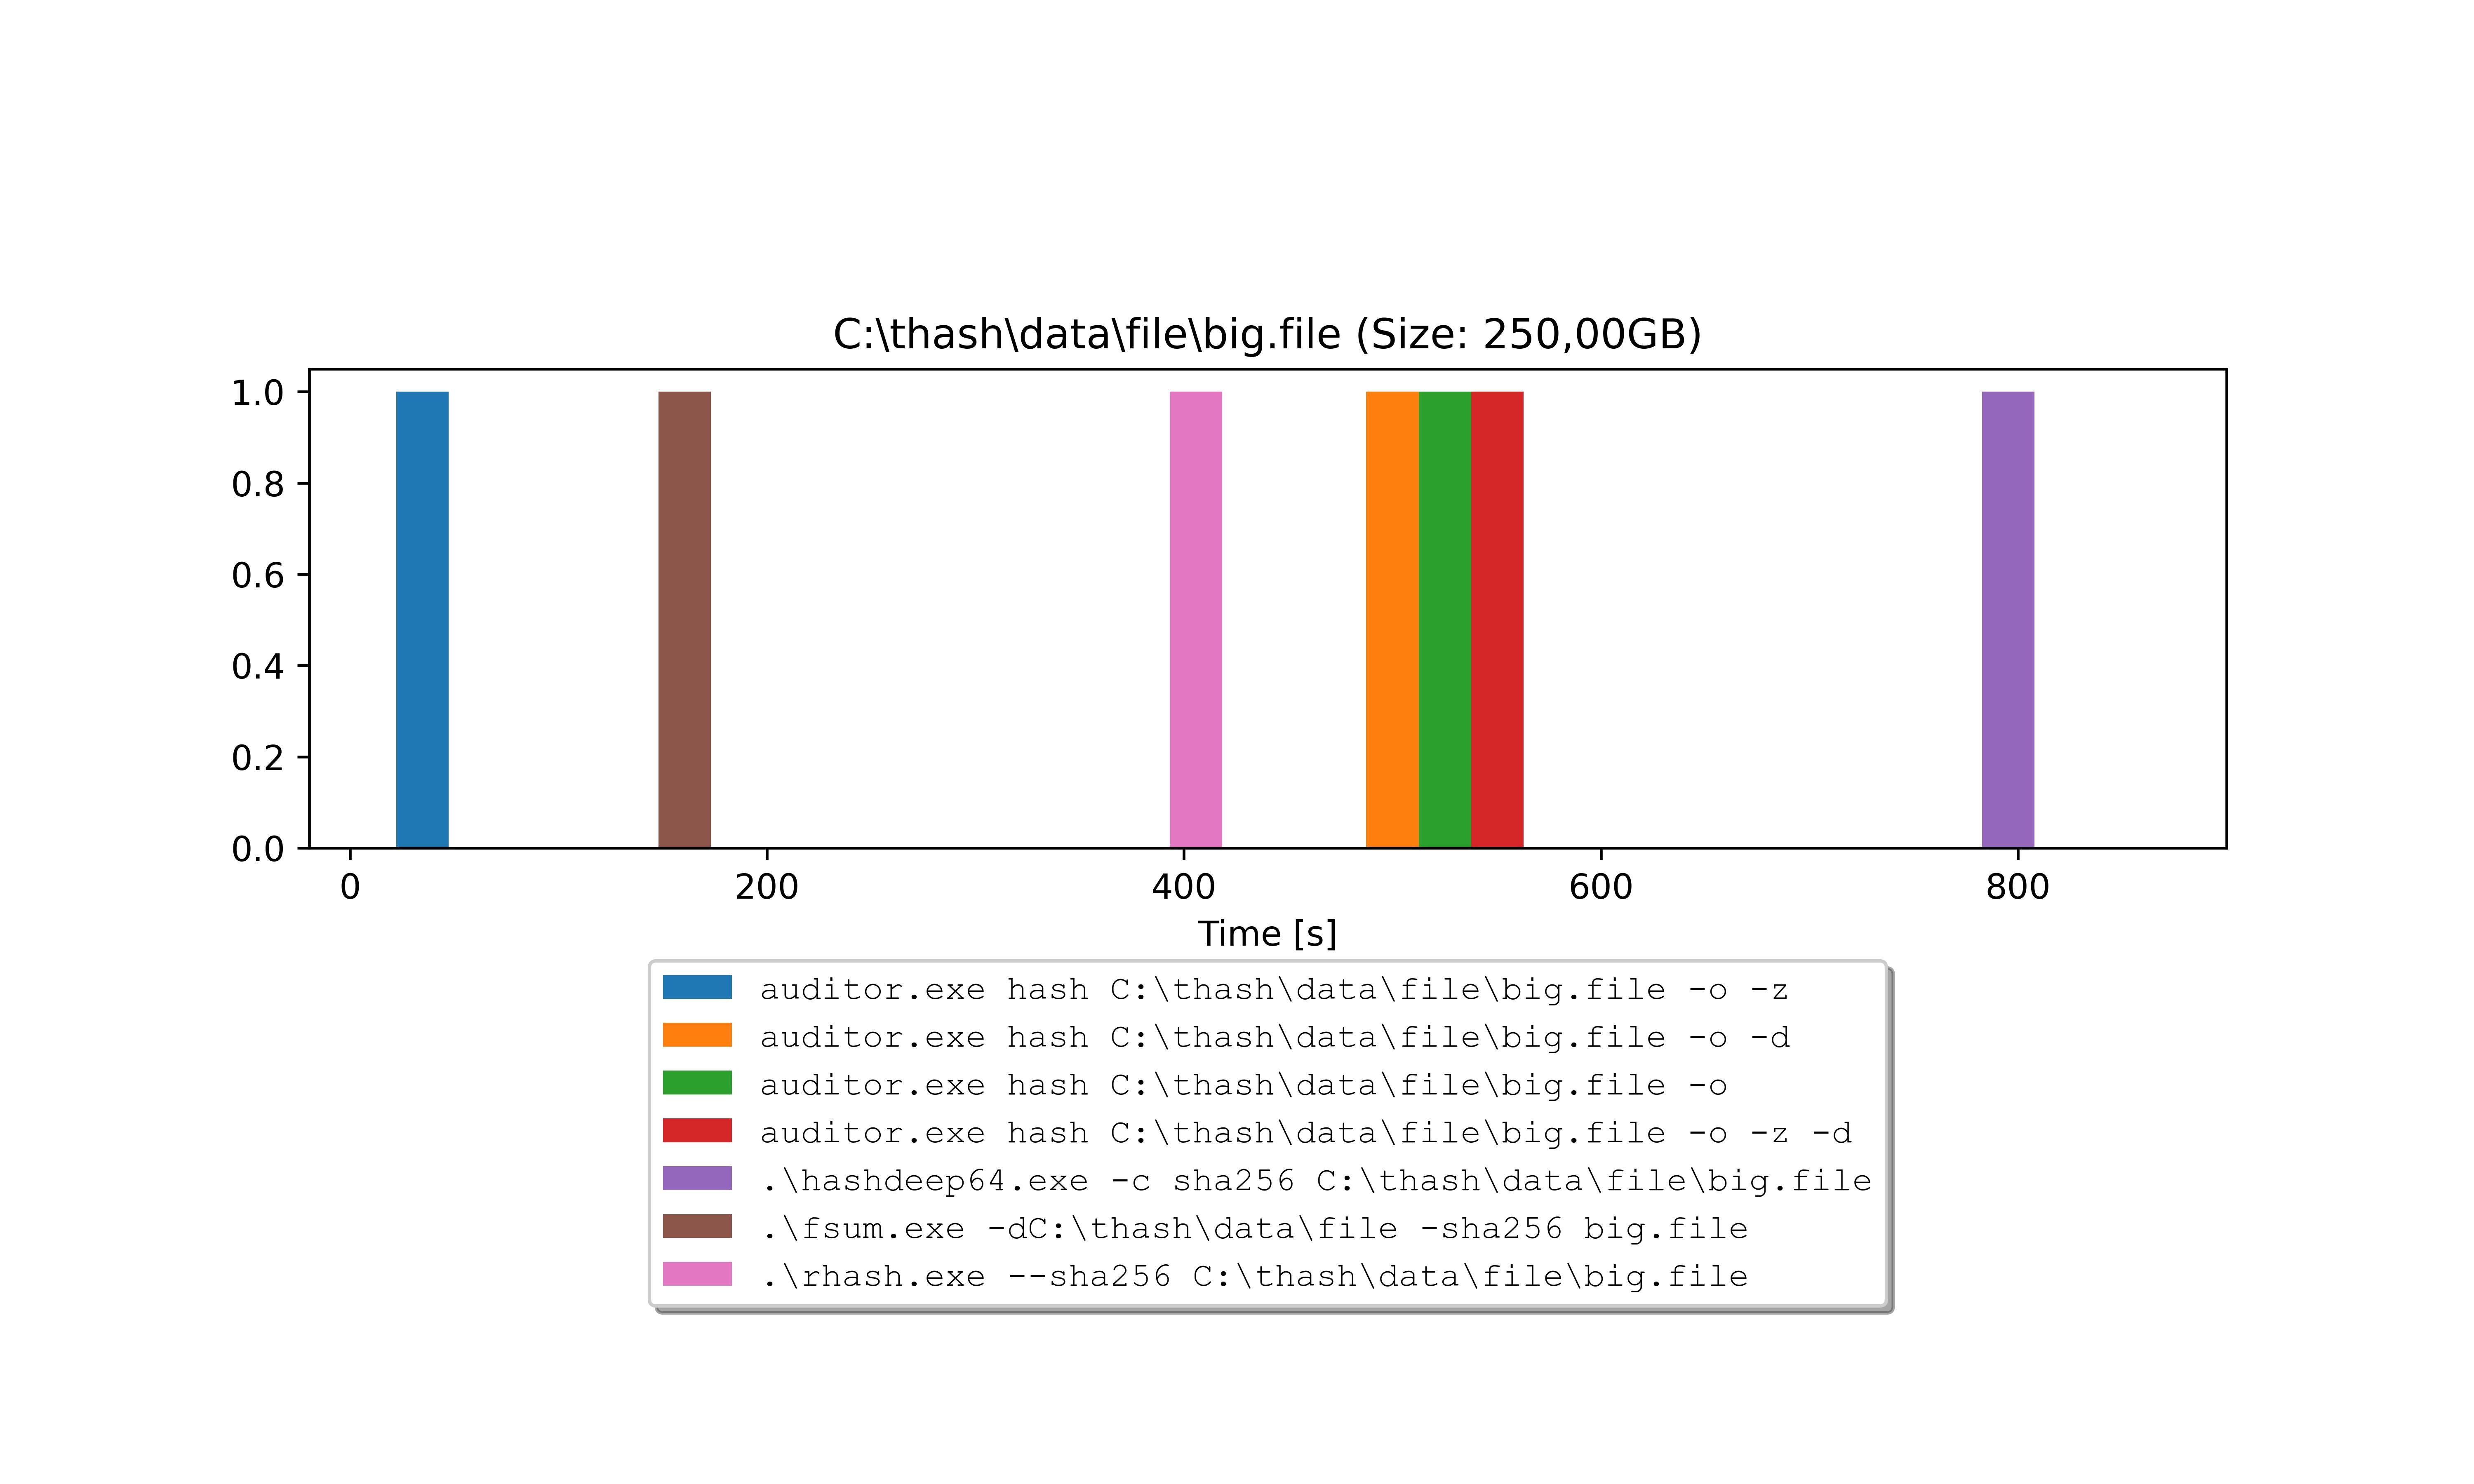
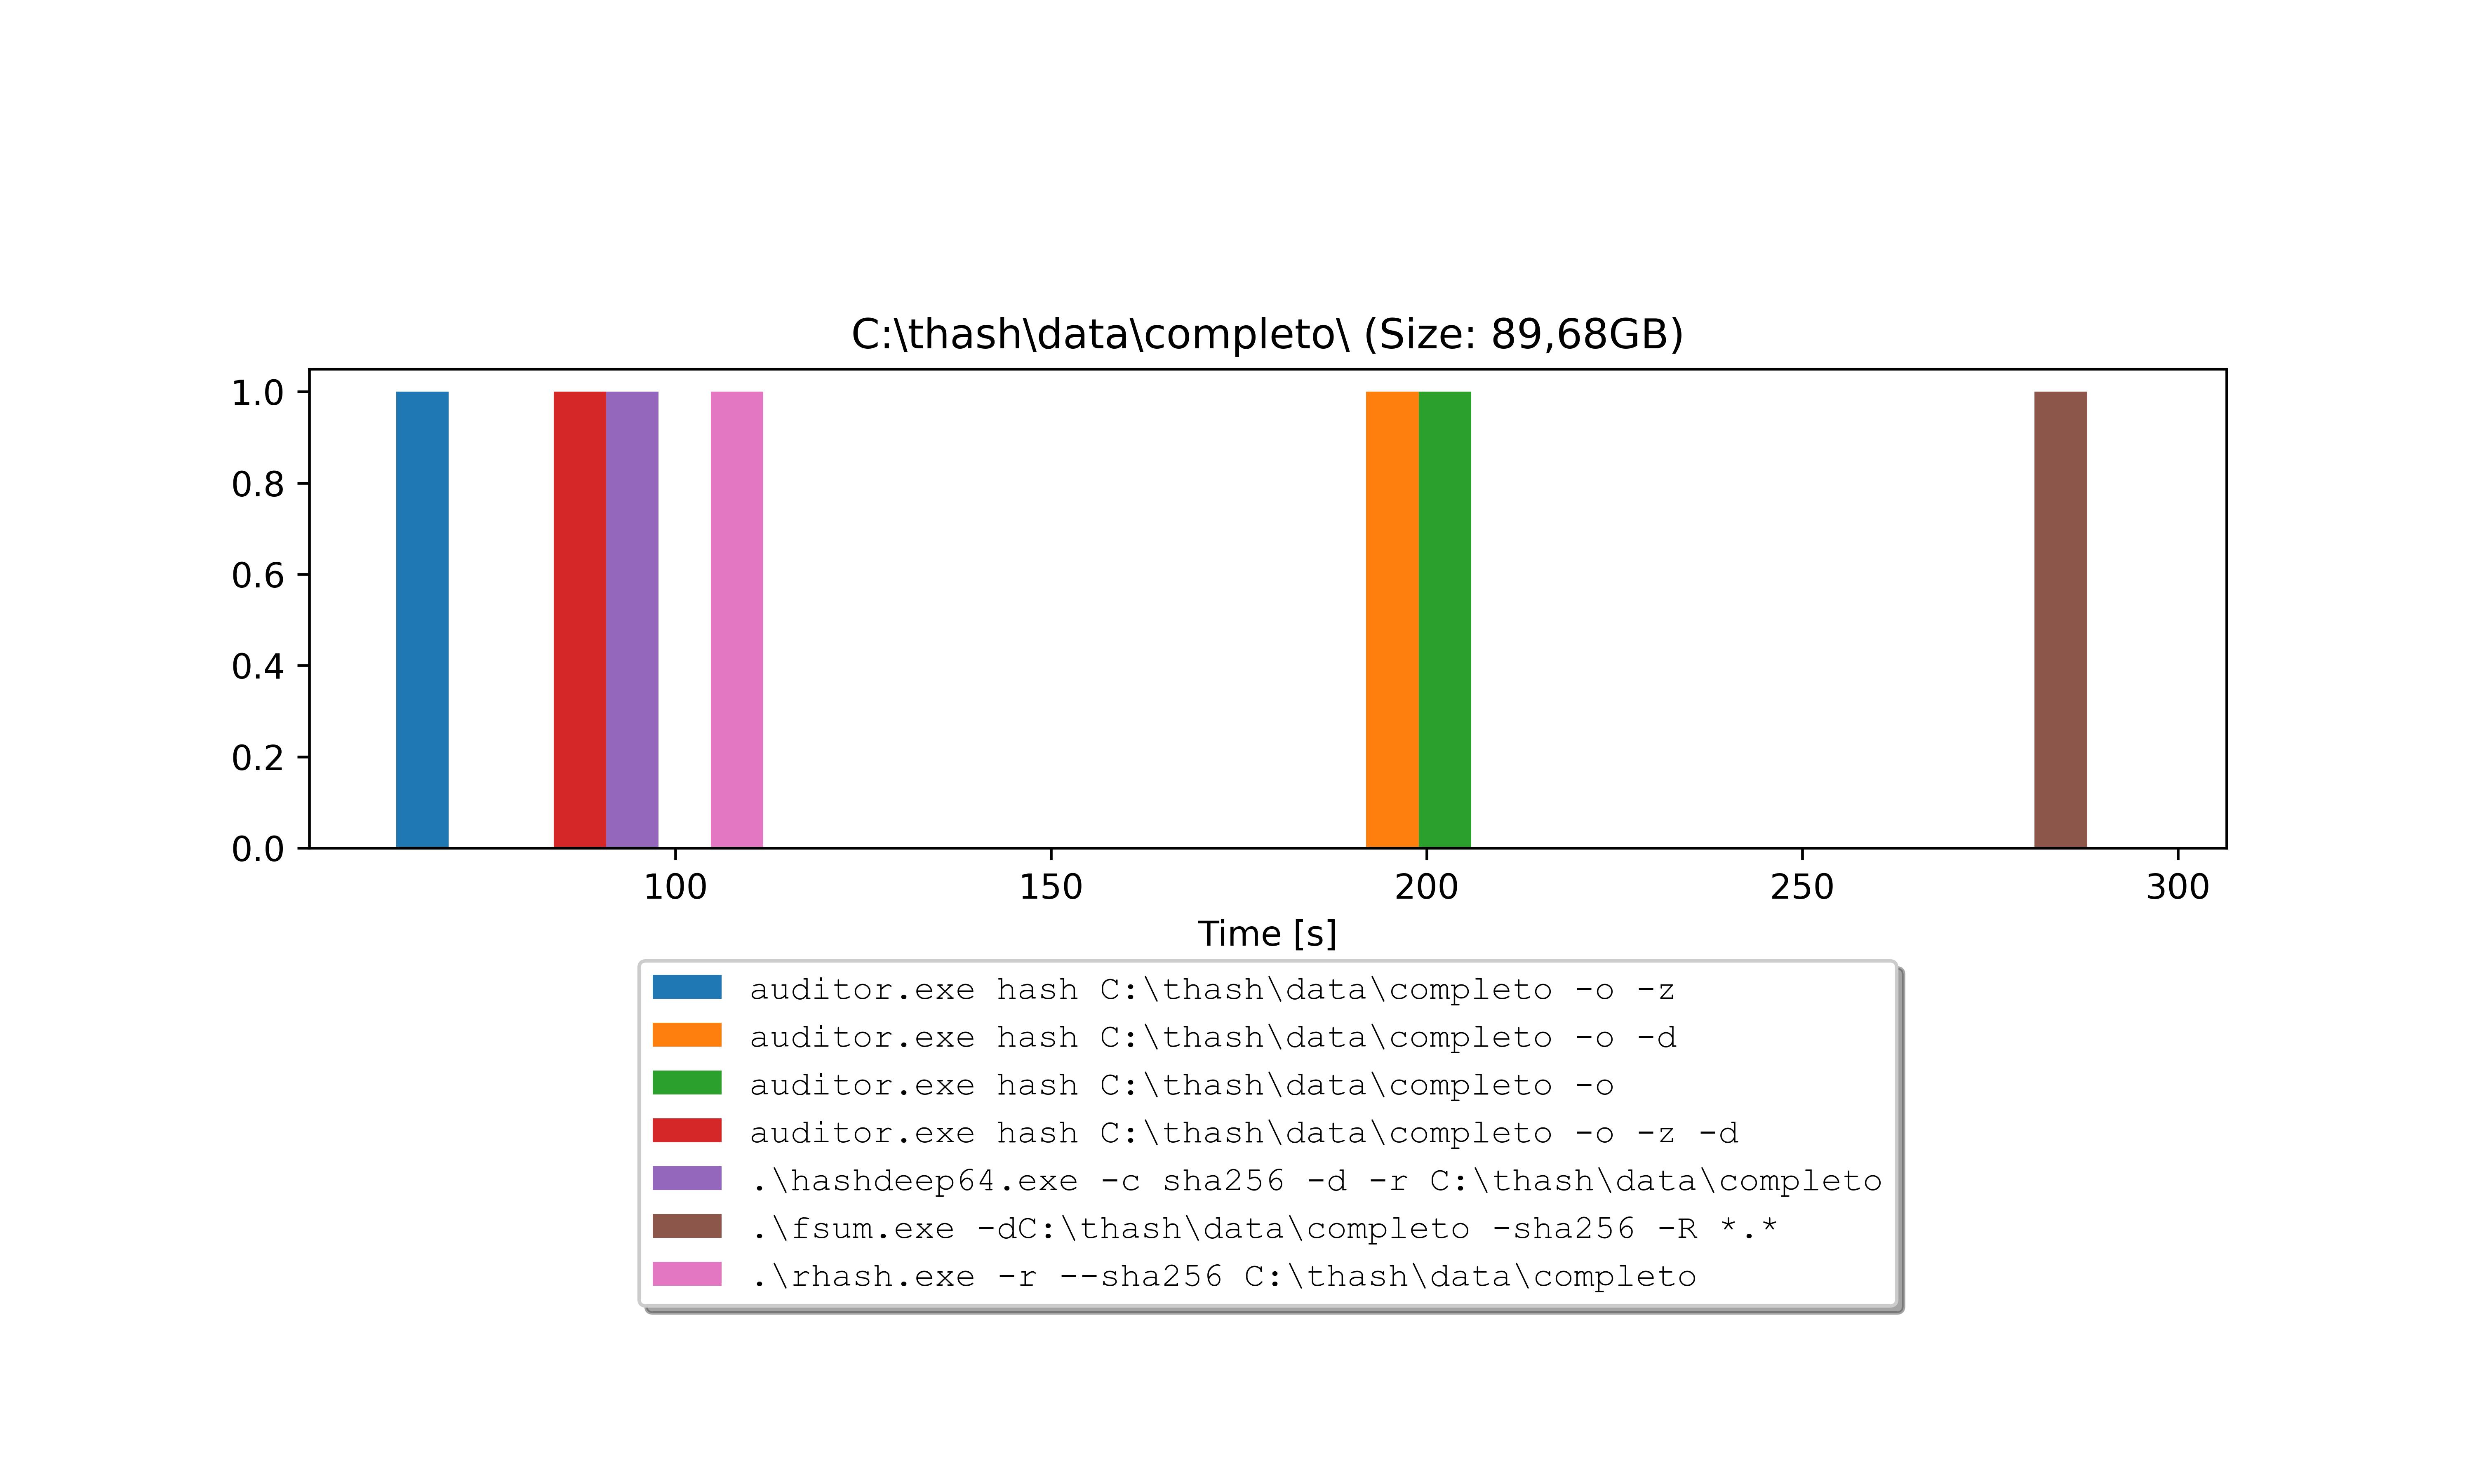
Overwrite audit files (-o), using a fast-disk (-z) with default algorithm (useful with SSD
disks, to be fast):
auditor hash input_path -o -z
Same that above, but with strict mode enable, to ensure that ALL files in input_path are
hashed:
auditor hash input_path -o -z --strict
Overwrite audit files (-o), without using thash method (-d):
auditor hash input_path -o -d
Overwrite audit files (-o), include only txt files (-i "**/*.txt") only in root folder (-u
1) (flag -i and -e use glob pattern, see Notes to details).
auditor hash input_path -o -i "**/*.txt" -u 1
Overwrite audit files (-o), include all files, except txt files (-e "**/*.txt")
auditor hash input_path -o -e "**/*.txt"
Overwrite audit files (-o), include only files with name "file1.doc" (-i "**/*/file1.doc")
and "file2.xls" (-i "**/*/file2.xls")
Overwrite audit files (-o), include ALL files, except files inside folders $RECYCLE.BIN and
"System Volume
Information". Obs. The char $ in $RECYLE.BIN belongs to name and it need to be escaped with
a char \
before, to be correctly parsed!
Overwrite audit files (-o), use fast-disk (-z) and algorithm 'blake3' (very fast):
auditor hash input_path -o -z -a blake3
Overwrite audit files (-o), use blockSize 10MB and 'whirlpool'
hash function
auditor hash input_path -o -b 10MB -a whirlpool
)
lock is useful when the existing audit files must be preserved. It can be used in after
hash
command and prevent accidental generation of new audit files in input_path.
Basic usage of subcommand lock
auditor lock input_path
This will:
Create a file _auditor_lock.txt in input_path
with creation timestamp.
Hash subcommand will not be executed over a input_path locked.
To unlock input_path, you need delete manually the file _auditor_lock.txt
)
check is the second step of forensic auditing. It checks
the the integrity of data using information in the audit files and
can be used after hash was performed.
Basic usage of subcommand Check
auditor check input_path
This will:
Get audit files (Default path: inside root of input_path ):
Use integrity data listed in Audit_Stamp and check against Audit_FullList.
Use integrity data listed in Audit_FullList and check against
original files in input_path.
Show the recalculated integrity data of Audit_FullList.
Others examples:
Check in fast-disk mode (-z), using default audit files.
auditor check input_path -z
Same that above, but with strict mode enable, to ensure that ALL files in input_path are
verified.
auditor check input_path -z --strict
Check only txt files (-i "**/*.txt"), using default audit files (flag -i and -e use glob pattern, see Notes to details).
auditor check input_path -i "**/*.txt"
Check in quiet mode (-q) and stop on first error (-x), using
default audit files.
auditor check input_path -q -x
Check F:\data_path using audit files with specific names. (-f
to <Audit_FullList> and -s to <Audit_Stamp>)
Notes: To generate audit files, input_path can´t
have audit files (Audit_FullList and Audit_Stamp)! This is to prevent confusion with existing audit
files.
See all options with auditor clone --help
)
chkcopy is used to check data inside input_path against audit
files
and
copy to dest_path, and at the same time verify the integrity of the
copied
data
in dest_path.
Basic usage of subcommand chkcopy
auditor chkcopy input_path dest_path
This will:
Get files from input_path and check against integrity data from
audit
files;
Copy files to dest_path;
Check integrity of files in dest_path against integrity data from
audit
files.
Note: chkcopy don´t generate audit files !
In case of error, it will retry (default is 3 times, that can be changed.)
Others examples:
In fast-disk mode (-z) to fast disks like ssd, m.2, etc.
auditor chkcopy input_path dest_path -z
Same that above, but with strict mode enable, to ensure that ALL files in input_path are
checked and
copied:
auditor chkcopy input_path dest_path --strict
In quiet mode (-q) and stop on first error (-x).
auditor chkcopy input_path dest_path -q -x
You can use -i and/or -e to include or exclude files of process (Can´t be used with
--strict).
Note:input_path must to have audit files
(Audit_FullList / Audit_Stamp)!
)
info does not perform hash integrity check. It only tests
the audit files and the content of
input_path and shows useful
information. Can be used after hash was performed.
Example of Forensic Info
auditor info input_path
This will:
Get audit files (Default path: inside root of input_path ):
Verify if audit files
Audit_Stamp and
Audit_FullList exists.
Verify if files listed in
Audit_Stamp and
Audit_FullList exists and listed
size is the same that in
input_path.
Verify if all files in
input_path are listed in
Audit_FullList.
Recalculate integrity data of Audit_FullList
and check against audit file Audit_Stamp
Give a report of size of the files and of all input_path.
)
Notes
1: In windows powershell, paths with names that contain spaces must be
enclosed in quotes without the single ending \.
If you want, use double backslash in ending \\. This is because the
single
backslash escape the ending quotes, and the terminal can´t interpret the path correctly.
This Works: "C:\My Data Path" or "C:\My Data Path\\"
Download and integrity data of binaries (inside zip):
Disclaimer: This version of auditor is provided as
development-stage software, with NO warranty or support of any kind, and is free for
non-commercial use only. Use it at your own risk.
License: This version of auditor is licensed for
non-commercial use only. Please review the full
license terms for details.
Extras
Format of Audit files
The format of audit files are simple. Each line contains:
ALGORITHM[<THASH-BlockSize>]: ALGORITHM used to hash, stored in
capital letters to mantain
compatibility with some others tools. The parameter with
<THASH-BlockSize> is optional, indicating that thash method and
BlockSize were used. BlockSize must be in KB, MB, GB or TB. Ex: 10MB.
file_size: FileSize of original
file when was hashed. Useful in check, to improve speed when size
doesnt match. Why hash a big file when already is known that its size
does not match with original?
[:hex]: Optional flag to
indicate that filepaths is in hex format. This is necessary because
char as '\n', '\r' or '\0', are permitted in some OS, and the hex
avoid problems with formatting the results.
relative_filepath: The relative
filepath of file hashed.
Example 1: using method
thash with algorithm sha256
and BlockSize 50MB :